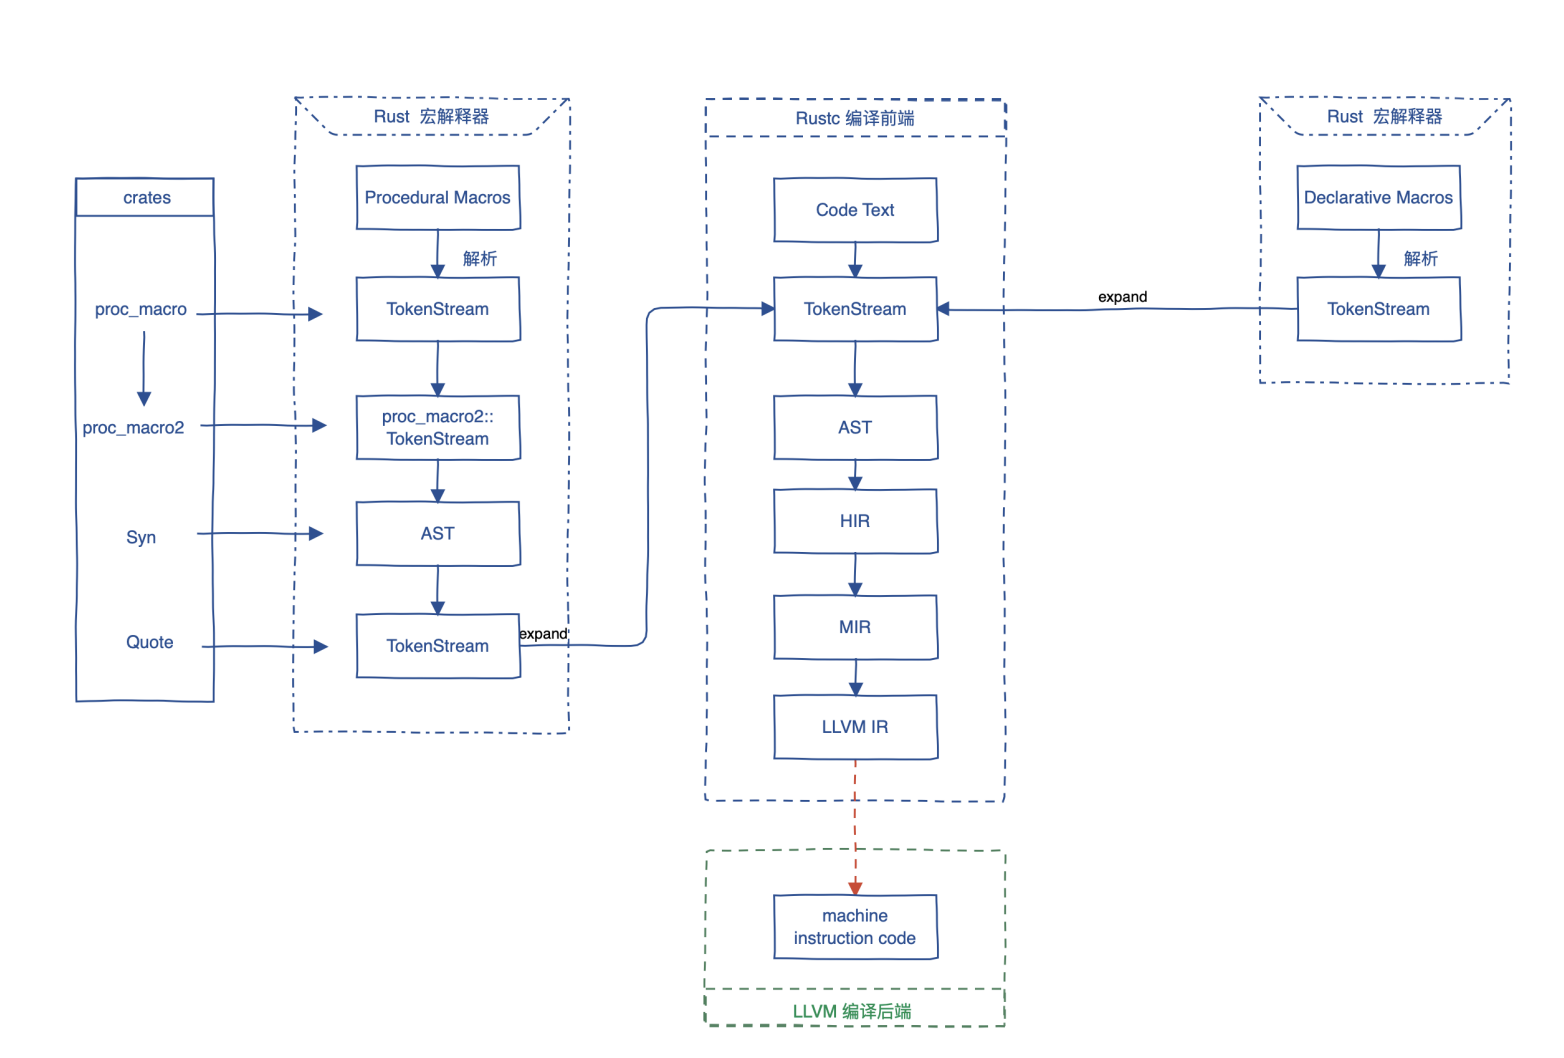
Rust的编译过程

几个python文件:

x.py

1
2
3
4
5
6
7
8
9
10
11
12
13
14
15
16
17
18
19
20
21
22
23
24
25
26
27
28
29
30
31
32
33
34
35
36
37
38
39
40
41
42
43
44
45
46
47
48
49
50
#!/usr/bin/env python3
# Some systems don't have `python3` in their PATH. This isn't supported by x.py directly;
# they should use `x` or `x.ps1` instead.

# This file is only a "symlink" to bootstrap.py, all logic should go there.

# Parts of `bootstrap.py` use the `multiprocessing` module, so this entry point
# must use the normal `if __name__ == '__main__':` convention to avoid problems.
if __name__ == '__main__':
import os
import sys
import warnings
from inspect import cleandoc

major = sys.version_info.major
minor = sys.version_info.minor

# If this is python2, check if python3 is available and re-execute with that
# interpreter. Only python3 allows downloading CI LLVM.
#
# This matters if someone's system `python` is python2.
if major < 3:
try:
os.execvp("py", ["py", "-3"] + sys.argv)
except OSError:
try:
os.execvp("python3", ["python3"] + sys.argv)
except OSError:
# Python 3 isn't available, fall back to python 2
pass

# soft deprecation of old python versions
skip_check = os.environ.get("RUST_IGNORE_OLD_PYTHON") == "1"
if not skip_check and (major < 3 or (major == 3 and minor < 6)):
msg = cleandoc("""
Using python {}.{} but >= 3.6 is recommended. Your python version
should continue to work for the near future, but this will
eventually change. If python >= 3.6 is not available on your system,
please file an issue to help us understand timelines.

This message can be suppressed by setting `RUST_IGNORE_OLD_PYTHON=1`
""".format(major, minor))
warnings.warn(msg, stacklevel=1)

rust_dir = os.path.dirname(os.path.abspath(__file__))
# For the import below, have Python search in src/bootstrap first.
sys.path.insert(0, os.path.join(rust_dir, "src", "bootstrap"))

import bootstrap
bootstrap.main()

这段代码是一个用于引导执行 Python 脚本的入口点(entry point),主要目的是确保脚本在适当的 Python 环境下运行,并处理一些兼容性问题。下面逐部分解释这个代码的意义:


1. 文件头部:#!/usr/bin/env python3

这是一种 shebang(脚本解释器声明),用于指定运行脚本的解释器。它告诉系统使用 env 工具来定位 python3 解释器的路径,并用它来运行脚本。

  • 这比直接写 #!/usr/bin/python3 更通用,因为在不同系统上,python3 的路径可能不同,但 env 会根据 PATH 环境变量找到正确的解释器。
  • 如果系统中没有 python3,脚本会提示用户使用其他方法(如 xx.ps1)。

2. 说明文件功能

这些注释解释了文件的目的和设计原则:

  • “symlink” 作用:这个文件只是一个“入口点”,所有的实际逻辑都在 bootstrap.py 中。它相当于一个“快捷方式”。
  • multiprocessing 模块的注意事项:由于部分逻辑依赖 Python 的 multiprocessing 模块,而这个模块在子进程中执行代码时需要遵循 if __name__ == "__main__": 约定,因此入口点必须符合这个惯例。

3. Python 版本检测与切换

Python 2 检测与自动切换

  • 如果检测到当前运行的是 Python 2(通过 sys.version_info.major < 3),它会尝试自动切换到 Python 3:
    • 首先尝试使用 py -3 (Windows 上的多版本 Python 管理工具)。
    • 如果失败,则尝试直接调用 python3
    • 如果两者都不可用,则继续用 Python 2 执行,但会受限于功能(比如无法下载 CI 的 LLVM)。

Python 版本“软弃用”提示

  • 如果检测到 Python 版本低于 3.6(例如 3.5 或更低),它会发出警告,但并不会强制中断运行。
  • 提示用户尽量升级到 Python 3.6 或更高版本,因为未来可能会停止支持较老的版本。
  • 用户可以通过设置环境变量 RUST_IGNORE_OLD_PYTHON=1 来跳过这个检查。

4. 设置路径并导入 bootstrap

  • 脚本获取当前文件的绝对路径(os.path.abspath(__file__))并推导出 Rust 项目的根目录。
  • 它将 src/bootstrap 添加到 sys.path,确保 Python 优先从这个目录中加载模块。
  • 最后,它导入并调用 bootstrap.main(),将控制权交给 bootstrap.py

5. 用途背景

从代码的注释来看,这段脚本可能是 Rust 项目中的一部分,用于引导构建或配置 Rust 的开发环境(例如编译器、工具链等)。具体功能由 bootstrap.py 决定。


总结

这段脚本的主要功能是:

  1. 确保脚本在符合最低要求的 Python 版本上运行。
  2. 尽量自动切换到 Python 3 环境(如果当前是 Python 2)。
  3. 提示用户升级 Python 版本,但不会强制中断旧版本的运行。
  4. 将工作交由真正的逻辑文件 bootstrap.py

它是一个典型的入口脚本,主要关注兼容性和环境配置,便于开发者在不同系统上顺利运行 Rust 项目相关的工具链。


x

1
2
3
4
5
6
7
8
9
10
11
12
13
14
15
16
17
18
19
20
21
22
23
24
25
26
27
28
29
30
31
32
33
34
35
36
37
38
39
40
41
42
43
44
45
#!/bin/sh

# Modern Linux and macOS systems commonly only have a thing called `python3` and
# not `python`, while Windows commonly does not have `python3`, so we cannot
# directly use python in the x.py shebang and have it consistently work. Instead we
# have a shell script to look for a python to run x.py.

set -eu

# syntax check
sh -n "$0"

realpath() {
local path="$1"
if [ -L "$path" ]; then
readlink -f "$path"
elif [ -d "$path" ]; then
(cd -P "$path" && pwd)
else
echo "$(realpath "$(dirname "$path")")/$(basename "$path")"
fi
}

xpy=$(dirname "$(realpath "$0")")/x.py

# On Windows, `py -3` sometimes works. We need to try it first because `python3`
# sometimes tries to launch the app store on Windows.
for SEARCH_PYTHON in py python3 python python2; do
if python=$(command -v $SEARCH_PYTHON) && [ -x "$python" ]; then
if [ $SEARCH_PYTHON = py ]; then
extra_arg="-3"
else
extra_arg=""
fi
exec "$python" $extra_arg "$xpy" "$@"
fi
done

python=$(bash -c "compgen -c python" | grep '^python[2-3]\.[0-9]+$' | head -n1)
if ! [ "$python" = "" ]; then
exec "$python" "$xpy" "$@"
fi

echo "$0: error: did not find python installed" >&2
exit 1

这段代码是一个 shell 脚本,用于在不同系统上寻找合适的 Python 解释器来运行 x.py 脚本。它解决了 Python 解释器命名和路径的兼容性问题,确保脚本能够在各种平台(Linux、macOS、Windows 等)上顺利运行。以下是详细的解释:


代码逐行解析

1. Shebang 声明

1
#!/bin/sh

指定使用 /bin/sh 来解释运行该脚本。这是一个通用的 POSIX shell,确保脚本具有良好的跨平台兼容性。


2. 注释说明

1
2
3
4
# Modern Linux and macOS systems commonly only have a thing called `python3` and
# not `python`, while Windows commonly does not have `python3`, so we cannot
# directly use python in the x.py shebang and have it consistently work. Instead we
# have a shell script to look for a python to run x.py.
  • 背景:不同操作系统上的 Python 解释器命名方式不一致。
    • Linux/macOS 上,现代系统通常只有 python3
    • Windows 上,系统可能只有 python 或通过 py -3 管理 Python 版本。
  • 解决方案:使用这个脚本动态地查找可用的 Python 解释器,而不是直接依赖 x.py 的 shebang。

3. 设置 Shell 选项

1
set -eu
  • -e:如果脚本中的某个命令返回非零退出码(即发生错误),脚本会立即退出。
  • -u:如果脚本中使用了未定义的变量,脚本会立即退出,避免错误。

4. 语法检查

1
sh -n "$0"
  • 对当前脚本文件($0)执行语法检查。
  • 这一步不会真正运行脚本,只是验证其语法是否正确。

5. 定义 realpath 函数

1
2
3
4
5
6
7
8
9
10
realpath() {
local path="$1"
if [ -L "$path" ]; then
readlink -f "$path"
elif [ -d "$path" ]; then
(cd -P "$path" && pwd)
else
echo "$(realpath "$(dirname "$path")")/$(basename "$path")"
fi
}
  • 目的:实现跨平台的 realpath 功能,用于解析文件的绝对路径。
    • 如果文件是符号链接(-L),用 readlink -f 获取实际路径。
    • 如果是目录(-d),进入该目录并输出其绝对路径。
    • 否则,递归调用自身,组合路径的目录名和文件名。

6. 确定 x.py 的路径

1
xpy=$(dirname "$(realpath "$0")")/x.py
  • 获取当前脚本所在目录的绝对路径(通过 realpathdirname),并在该目录下找到 x.py
  • 这样确保脚本无论从哪个位置运行,都可以正确定位到 x.py

7. 遍历寻找 Python 解释器

1
2
3
4
5
6
7
8
9
10
for SEARCH_PYTHON in py python3 python python2; do
if python=$(command -v $SEARCH_PYTHON) && [ -x "$python" ]; then
if [ $SEARCH_PYTHON = py ]; then
extra_arg="-3"
else
extra_arg=""
fi
exec "$python" $extra_arg "$xpy" "$@"
fi
done
  • 遍历常见的 Python 解释器命令:pypython3pythonpython2
    • command -v:检查命令是否存在,并返回其路径。
    • [ -x ]:检查命令是否可执行。
  • 如果找到合适的解释器:
    • 如果是 py(Windows 上的版本管理器),添加参数 -3,指定使用 Python 3。
    • 否则直接运行。
  • exec:用找到的 Python 解释器替换当前脚本进程,并运行 x.py

8. 尝试通过 compgen 查找 Python

1
2
3
4
python=$(bash -c "compgen -c python" | grep '^python[2-3]\.[0-9]+$' | head -n1)
if ! [ "$python" = "" ]; then
exec "$python" "$xpy" "$@"
fi
  • 如果上面的循环找不到 Python,尝试使用 compgen 命令查找所有以 python 开头的命令。
    • compgen -c python:列出所有以 python 开头的命令。
    • grep '^python[2-3]\.[0-9]+$':筛选出符合格式的 Python 版本(如 python3.9python2.7)。
    • head -n1:取第一个匹配项。
  • 如果找到合适的 Python,执行它。

9. 错误处理

1
2
echo "$0: error: did not find python installed" >&2
exit 1
  • 如果没有找到任何 Python 解释器,输出错误信息到标准错误(>&2),并退出脚本(状态码为 1)。

脚本的用途背景

这个脚本用于解决跨平台环境下运行 Python 脚本的兼容性问题,特别是在不同操作系统上 Python 解释器的命名不统一的情况下。它的主要功能是:

  1. 自动寻找合适的 Python 解释器。
  2. 支持多平台:Linux、macOS 和 Windows。
  3. 动态重定向:找到 Python 后,执行目标脚本 x.py,并将所有参数传递给它。

总结

  1. 核心问题:不同系统的 Python 解释器名称和路径不一致。
  2. 解决方案:通过脚本动态查找并执行合适的解释器。
  3. 优点:跨平台兼容,自动处理多种情况,避免手动配置。
  4. 适用场景:用于需要 Python 解释器的项目启动脚本,比如 x.py 可能是一个构建工具或脚本入口点。

x.ps1 (ps1是powershell)

1
2
3
4
5
6
7
8
9
10
11
12
13
14
15
16
17
18
19
20
21
22
23
24
25
26
27
28
29
30
31
32
33
34
35
36
37
38
39
40
41
42
43
44
45
#!/usr/bin/env pwsh

# See ./x for why these scripts exist.

$ErrorActionPreference = "Stop"

# syntax check
Get-Command -syntax ${PSCommandPath} >$null

$xpy = Join-Path $PSScriptRoot x.py
$xpy_args = @($xpy) + $args

function Get-Application($app) {
$cmd = Get-Command $app -ErrorAction SilentlyContinue -CommandType Application | Select-Object -First 1
return $cmd
}

function Invoke-Application($application, $arguments) {
& $application $arguments
Exit $LASTEXITCODE
}

foreach ($python in "py", "python3", "python", "python2") {
# NOTE: this only tests that the command exists in PATH, not that it's actually
# executable. The latter is not possible in a portable way, see
# https://github.com/PowerShell/PowerShell/issues/12625.
if (Get-Application $python) {
if ($python -eq "py") {
# Use python3, not python2
$xpy_args = @("-3") + $xpy_args
}
Invoke-Application $python $xpy_args
}
}

$found = (Get-Application "python*" | Where-Object {$_.name -match '^python[2-3]\.[0-9]+(\.exe)?$'})
if (($null -ne $found) -and ($found.Length -ge 1)) {
$python = $found[0]
Invoke-Application $python $xpy_args
}

$msg = "${PSCommandPath}: error: did not find python installed`n"
$msg += "help: consider installing it from https://www.python.org/downloads/"
Write-Error $msg -Category NotInstalled
Exit 1

以下是对您提供的 PowerShell 脚本的分析及其功能说明,内容将以中文进行阐述。


脚本功能概述

这段 PowerShell 脚本的主要目的是:

  1. 检查系统中是否安装了 Python 解释器。
  2. 自动寻找并调用合适的 Python 版本(pypython3pythonpython2)。
  3. 使用找到的 Python 解释器执行指定的 Python 脚本(x.py),并将参数传递给该脚本。
  4. 如果未找到 Python,则提示用户安装 Python,并提供官方下载链接(https://www.python.org/downloads/)。

脚本运行逻辑

  1. 语法自检
    脚本通过以下代码对自身进行语法检查:

    1
    Get-Command -syntax ${PSCommandPath} >$null

    如果语法有问题,将抛出错误。

  2. 寻找 Python 可执行文件

    • 脚本依次尝试查找以下 Python 解释器命令(从高到低优先级):
      • py
      • python3
      • python
      • python2
    • 使用 Get-Command-CommandType Application 限定搜索范围为应用程序:
      1
      Get-Command $app -ErrorAction SilentlyContinue -CommandType Application
      如果找到可用的命令,将尝试调用它。
  3. 特殊处理 py 命令

    • 如果找到的是 py 命令,默认会运行 Python 3(通过添加 -3 参数)。例如:
      1
      $xpy_args = @("-3") + $xpy_args
  4. 执行 Python 脚本

    • 如果找到合适的 Python 解释器,脚本会调用 Invoke-Application 函数,用该解释器运行目标 Python 脚本:
      1
      Invoke-Application $python $xpy_args
    • 执行完成后,脚本会退出,返回 Python 脚本的退出码($LASTEXITCODE)。
  5. 备用查找机制

    • 如果第一轮查找未找到 Python,脚本会尝试通过通配符模式(python*)寻找其他 Python 可执行文件,例如 python3.xpython2.x
    • 找到后会使用第一个匹配的结果运行目标脚本。
  6. 错误处理

    • 如果系统中没有找到任何 Python 解释器,脚本会返回错误消息并停止运行:
      1
      2
      3
      4
      $msg = "${PSCommandPath}: error: did not find python installed`n"
      $msg += "help: consider installing it from https://www.python.org/downloads/"
      Write-Error $msg -Category NotInstalled
      Exit 1

与 PowerShell 问题 #12625 的关系

脚本中提到的 GitHub 问题 PowerShell Issue #12625 是一个已知问题。它指出:

  • Get-Command 有时会错误地将非可执行文件(如文档文件)识别为应用程序。
  • 这种错误可能会导致脚本误判非 Python 可执行文件为合法的 Python 解释器。

脚本如何缓解这个问题?

  • 使用 -CommandType Application 限制结果仅为应用程序类型。
  • 添加 ErrorAction SilentlyContinue,忽略潜在错误。
  • 但仍无法完全避免误判,因为 PowerShell 的内置机制无法便携地验证文件是否真正可执行。

与 Python 官方下载页面的关系

如果系统中未找到任何 Python 解释器,脚本会提示用户安装 Python,并提供官方下载页面链接:https://www.python.org/downloads/。该页面包含:

  1. 最新稳定版本(目前为 Python 3.13.0)。
  2. 各平台(Windows、macOS、Linux 等)的安装包和源代码。
  3. 开发版本(如 Python 3.14 的预发行版)。

用户可以根据系统需求,从页面中选择适合的 Python 版本进行安装。


改进建议

  1. 验证可执行文件路径
    当前脚本仅依赖 Get-Command 检测命令是否存在,但无法验证命令是否真正可执行。可以添加额外的路径检查,例如:

    1
    2
    3
    4
    $cmd = Get-Application $python
    if ($cmd -and (Test-Path $cmd.Source)) {
    Invoke-Application $cmd.Source $xpy_args
    }
  2. 改进错误提示
    提供更详细的安装指导,例如根据操作系统给出具体命令:

    • Windows 用户:建议安装 Windows installer (64-bit)
    • macOS 用户:建议使用 Homebrew 安装。
    • Linux 用户:建议通过软件包管理器(如 apt-getyum)安装。
  3. 自动安装功能
    如果未找到 Python,可进一步优化脚本,自动从官方页面下载并安装 Python(需管理员权限)。

  4. 兼容性增强
    考虑到不同平台的路径和命令差异,脚本可以扩展为平台特定的查找逻辑,例如在 macOS/Linux 上检查 /usr/bin/python3/usr/local/bin/python3


总结

这段 PowerShell 脚本设计合理,能够在绝大多数情况下找到系统中的 Python 解释器并执行指定脚本。然而,由于 PowerShell 的 Get-Command 存在误判问题,某些情况下可能会导致错误。此外,脚本建议用户从 Python 官方下载页面 获取 Python,这与脚本的功能和提示高度一致。

通过适当的改进(如验证路径、提供更详细的错误提示和自动安装功能),该脚本可以更加可靠和用户友好。


src/bootstrap/README.md

1
2
3
4
5
6
7
8
9
10
11
12
13
14
15
16
17
18
19
20
21
22
23
24
25
26
27
28
29
30
31
32
33
34
35
36
37
38
39
40
41
42
43
44
45
46
47
48
49
50
51
52
53
54
55
56
57
58
59
60
61
62
63
64
65
66
67
68
69
70
71
72
73
74
75
76
77
78
79
80
81
82
83
84
85
86
87
88
89
90
91
92
93
94
95
96
97
98
99
100
101
102
103
104
105
106
107
108
109
110
111
112
113
114
115
116
117
118
119
120
121
122
123
124
125
126
127
128
129
130
131
132
133
134
135
136
137
138
139
140
141
142
143
144
145
146
147
148
149
150
151
# Bootstrapping Rust

This README is aimed at helping to explain how Rust is bootstrapped,
and some of the technical details of the bootstrap build system.

Note that this README only covers internal information, not how to use the tool.
Please check [bootstrapping dev guide][bootstrapping-dev-guide] for further information.

[bootstrapping-dev-guide]: https://rustc-dev-guide.rust-lang.org/building/bootstrapping/intro.html

## Introduction

The build system defers most of the complicated logic of managing invocations
of rustc and rustdoc to Cargo itself. However, moving through various stages
and copying artifacts is still necessary for it to do. Each time bootstrap
is invoked, it will iterate through the list of predefined steps and execute
each serially in turn if it matches the paths passed or is a default rule.
For each step, bootstrap relies on the step internally being incremental and
parallel. Note, though, that the `-j` parameter to bootstrap gets forwarded
to appropriate test harnesses and such.

## Build phases

Bootstrap build system goes through a few phases to actually build the
compiler. What actually happens when you invoke bootstrap is:

1. The entry point script (`x` for unix like systems, `x.ps1` for windows systems,
`x.py` cross-platform) is run. This script is responsible for downloading the stage0
compiler/Cargo binaries, and it then compiles the build system itself (this folder).
Finally, it then invokes the actual `bootstrap` binary build system.
2. In Rust, `bootstrap` will slurp up all configuration, perform a number of
sanity checks (whether compilers exist, for example), and then start building the
stage0 artifacts.
3. The stage0 `cargo`, downloaded earlier, is used to build the standard library
and the compiler, and then these binaries are then copied to the `stage1`
directory. That compiler is then used to generate the stage1 artifacts which
are then copied to the stage2 directory, and then finally, the stage2
artifacts are generated using that compiler.

The goal of each stage is to (a) leverage Cargo as much as possible and failing
that (b) leverage Rust as much as possible!

## Directory Layout

This build system houses all output under the `build` directory, which looks
like this:

```sh
# Root folder of all output. Everything is scoped underneath here
build/

# Location where the stage0 compiler downloads are all cached. This directory
# only contains the tarballs themselves, as they're extracted elsewhere.
cache/
2015-12-19/
2016-01-15/
2016-01-21/
...

# Output directory for building this build system itself. The stage0
# cargo/rustc are used to build the build system into this location.
bootstrap/
debug/
release/

# Output of the dist-related steps like dist-std, dist-rustc, and dist-docs
dist/

# Temporary directory used for various input/output as part of various stages
tmp/

# Each remaining directory is scoped by the "host" triple of compilation at
# hand.
x86_64-unknown-linux-gnu/

# The build artifacts for the `compiler-rt` library for the target that
# this folder is under. The exact layout here will likely depend on the
# platform, and this is also built with CMake, so the build system is
# also likely different.
compiler-rt/
build/

# Output folder for LLVM if it is compiled for this target
llvm/

# build folder (e.g. the platform-specific build system). Like with
# compiler-rt, this is compiled with CMake
build/

# Installation of LLVM. Note that we run the equivalent of 'make install'
# for LLVM, to setup these folders.
bin/
lib/
include/
share/
...

# Output folder for all documentation of this target. This is what's filled
# in whenever the `doc` step is run.
doc/

# Output for all compiletest-based test suites
test/
ui/
debuginfo/
...

# Location where the stage0 Cargo and Rust compiler are unpacked. This
# directory is purely an extracted and overlaid tarball of these two (done
# by the bootstrap Python script). In theory, the build system does not
# modify anything under this directory afterwards.
stage0/

# These to-build directories are the cargo output directories for builds of
# the standard library, the test system, the compiler, and various tools,
# respectively. Internally, these may also
# have other target directories, which represent artifacts being compiled
# from the host to the specified target.
#
# Essentially, each of these directories is filled in by one `cargo`
# invocation. The build system instruments calling Cargo in the right order
# with the right variables to ensure that these are filled in correctly.
stageN-std/
stageN-test/
stageN-rustc/
stageN-tools/

# This is a special case of the above directories, **not** filled in via
# Cargo but rather the build system itself. The stage0 compiler already has
# a set of target libraries for its own host triple (in its own sysroot)
# inside of stage0/. When we run the stage0 compiler to bootstrap more
# things, however, we don't want to use any of these libraries (as those are
# the ones that we're building). So essentially, when the stage1 compiler is
# being compiled (e.g. after libstd has been built), *this* is used as the
# sysroot for the stage0 compiler being run.
#
# Basically, this directory is just a temporary artifact used to configure the
# stage0 compiler to ensure that the libstd that we just built is used to
# compile the stage1 compiler.
stage0-sysroot/lib/

# These output directories are intended to be standalone working
# implementations of the compiler (corresponding to each stage). The build
# system will link (using hard links) output from stageN-{std,rustc} into
# each of these directories.
#
# In theory these are working rustc sysroot directories, meaning there is
# no extra build output in these directories.
stage1/
stage2/
stage3/

Extending bootstrap

When you use bootstrap, you’ll call it through the entry point script
(x, x.ps1, or x.py). However, most of the code lives in src/bootstrap.
bootstrap has a difficult problem: it is written in Rust, but yet it is run
before the Rust compiler is built! To work around this, there are two components
of bootstrap: the main one written in rust, and bootstrap.py. bootstrap.py
is what gets run by entry point script. It takes care of downloading the stage0
compiler, which will then build the bootstrap binary written in Rust.

Because there are two separate codebases behind x.py, they need to
be kept in sync. In particular, both bootstrap.py and the bootstrap binary
parse config.toml and read the same command line arguments. bootstrap.py
keeps these in sync by setting various environment variables, and the
programs sometimes have to add arguments that are explicitly ignored, to be
read by the other.

Some general areas that you may be interested in modifying are:

  • Adding a new build tool? Take a look at bootstrap/src/core/build_steps/tool.rs
    for examples of other tools.
  • Adding a new compiler crate? Look no further! Adding crates can be done by
    adding a new directory with Cargo.toml, followed by configuring all
    Cargo.toml files accordingly.
  • Adding a new dependency from crates.io? This should just work inside the
    compiler artifacts stage (everything other than libtest and libstd).
  • Adding a new configuration option? You’ll want to modify bootstrap/src/core/config/flags.rs
    for command line flags and then bootstrap/src/core/config/config.rs to copy the flags to the
    Config struct.
  • Adding a sanity check? Take a look at bootstrap/src/core/sanity.rs.

If you make a major change on bootstrap configuration, please add a new entry to
CONFIG_CHANGE_HISTORY in src/bootstrap/src/utils/change_tracker.rs.

A ‘major change’ includes

  • A new option or
  • A change in the default options.

Changes that do not affect contributors to the compiler or users
building rustc from source don’t need an update to CONFIG_CHANGE_HISTORY.

If you have any questions, feel free to reach out on the #t-infra/bootstrap channel
at Rust Bootstrap Zulip server. When you encounter bugs,
please file issues on the Rust issue tracker.

Changelog

Because we do not release bootstrap with versions, we also do not maintain CHANGELOG files. To
review the changes made to bootstrap, simply run git log --no-merges --oneline -- src/bootstrap.

1
2
3
4
5
6
7
8
9
10
11
12
13
14
15
16
17
18
19
20
21
22
23
24
25
26
27
28
29
30
31
32
33
34
35
36
37
38
39
40
41
42
43
44
45
46
47
48
49
50
51
52
53
54
55
56
57
58
59
60
61
62
63
64
65
66
67
68
69
70
71
72
73
74
75
76
77
78
79
80
81
82
83
84
85
86
87
88
89
90
91
92
93
94
95
96
97
98
99
100
101
102


# Rust 的引导(Bootstrapping)

该文档旨在解释 Rust 的引导过程以及引导构建系统的一些技术细节。

请注意,本文档仅涵盖内部信息,而不是如何使用该工具。如果需要更多信息,请参阅 [引导开发指南][bootstrapping-dev-guide]。

[bootstrapping-dev-guide]: https://rustc-dev-guide.rust-lang.org/building/bootstrapping/intro.html

---

## 引言

Rust 的构建系统将大部分管理 `rustc` 和 `rustdoc` 调用的复杂逻辑移交给 Cargo 本身。然而,它仍需要完成通过各个阶段移动和复制工件的工作。每次引导程序被调用时,它都会遍历预定义的步骤列表,并依次执行每个步骤(如果与传递的路径匹配或是默认规则)。对于每个步骤,引导程序依赖于步骤本身是增量和并行的。不过,请注意,引导程序的 `-j` 参数会被转发到相关的测试框架等。

---

## 构建阶段

引导构建系统会经历几个阶段来完成编译器的构建。执行引导程序时会发生以下内容:

1. 入口脚本(Unix 系统为 `x`,Windows 系统为 `x.ps1`,跨平台为 `x.py`)被运行。该脚本负责下载阶段 0(stage0)的编译器和 Cargo 二进制文件,并随后编译构建系统本身(此文件夹)。最后,它调用实际的 `bootstrap` 二进制构建系统。
2. 在 Rust 中,`bootstrap` 会加载所有配置,执行一些检查操作(例如检查编译器是否存在),然后开始构建阶段 0 的工件。
3. 使用之前下载的阶段 0 `cargo` 构建标准库和编译器,这些二进制文件会被复制到阶段 1(stage1)的目录。随后,该编译器会用于生成阶段 1 的工件,这些工件会被复制到阶段 2(stage2)目录中,最后使用该编译器生成阶段 2 的工件。

每个阶段的目标是:(a) 尽可能利用 Cargo,(b) 在无法利用 Cargo 的情况下尽可能利用 Rust!

---

## 目录结构

引导构建系统将所有输出存储在 `build` 目录下,其结构如下:

```sh
# 所有输出的根目录,所有内容都位于此目录下
build/

# 阶段 0 编译器下载的缓存位置。此目录仅包含压缩包本身,解压后的内容存储在其他位置。
cache/
2015-12-19/
2016-01-15/
2016-01-21/
...

# 构建引导系统本身的输出目录。阶段 0 的 cargo/rustc 被用来构建引导系统到此位置。
bootstrap/
debug/
release/

# 与分发相关的步骤(如 dist-std、dist-rustc 和 dist-docs)的输出目录。
dist/

# 在各个阶段中用于输入/输出的临时目录。
tmp/

# 其余的每个目录按编译目标(host triple)进行划分。
x86_64-unknown-linux-gnu/

# 当前目标编译的 `compiler-rt` 库的构建工件。具体布局可能因平台不同而有所差异。
compiler-rt/
build/

# 如果为此目标编译了 LLVM,则其输出目录。
llvm/

# 平台特定的构建目录(例如,CMake 构建系统)。
build/

# LLVM 的安装目录,类似于运行 'make install' 后的文件结构。
bin/
lib/
include/
share/
...

# 针对此目标生成的所有文档的输出目录,运行 `doc` 步骤时会填充此目录。
doc/

# 所有基于 compiletest 的测试套件的输出。
test/
ui/
debuginfo/
...

# 阶段 0 Cargo 和 Rust 编译器的解压位置。此目录仅包含解压后的 tar 包内容,理论上构建系统不会修改此目录中的任何文件。
stage0/

# 这些目录是标准库、测试系统、编译器和各种工具的 cargo 输出目录。
stageN-std/
stageN-test/
stageN-rustc/
stageN-tools/

# 此目录是一个特殊情况,它不是通过 Cargo 填充的,而是通过引导构建系统本身生成的。
stage0-sysroot/lib/

# 这些输出目录是各个阶段的独立工作编译器实现。构建系统会通过硬链接将 `stageN-{std,rustc}` 的输出链接到这些目录中。
stage1/
stage2/
stage3/

扩展引导程序

使用引导程序时,通过入口脚本(xx.ps1x.py)调用它。然而,大部分代码位于 src/bootstrap 中。

引导程序面临的一个难题是:它是用 Rust 编写的,但它在 Rust 编译器构建之前运行!为了解决这个问题,引导程序由两个部分组成:主要部分用 Rust 编写,还有一个 bootstrap.pybootstrap.py 由入口脚本运行,负责下载阶段 0 编译器,然后构建用 Rust 编写的引导二进制文件。

由于引导程序有两个独立的代码库,它们需要保持同步。例如,bootstrap.py 和引导二进制文件都会解析 config.toml 并读取相同的命令行参数。通过设置环境变量,bootstrap.py 确保它们保持同步。

以下是可能需要修改的一些常见领域:

  • 添加新的构建工具:查看 bootstrap/src/core/build_steps/tool.rs 中的示例。
  • 添加新的编译器 crate:添加新目录和 Cargo.toml 文件,并更新所有相关 Cargo.toml 文件。
  • 添加新的 crates.io 依赖:在编译器工件阶段(libtest 和 libstd 除外)中应该直接可用。
  • 添加新的配置选项:修改 bootstrap/src/core/config/flags.rs 中的命令行标志,并更新 bootstrap/src/core/config/config.rs 将标志复制到 Config 结构体中。
  • 添加检查逻辑:查看 bootstrap/src/core/sanity.rs

如果对引导配置进行了重大更改,请在 src/bootstrap/src/utils/change_tracker.rsCONFIG_CHANGE_HISTORY 中添加新条目。

重大更改包括:

  1. 新选项。
  2. 默认选项的更改。

不影响编译器贡献者或从源码构建 Rust 编译器的用户的更改无需更新 CONFIG_CHANGE_HISTORY

如果有任何疑问,请在 Rust Bootstrap Zulip 频道 上联系 #t-infra/bootstrap。如果遇到错误,请在 Rust 问题跟踪器 上提交问题。


更新日志

由于引导程序没有发布版本,我们也不维护 CHANGELOG 文件。如需查看引导程序的更改记录,运行以下命令:

1
git log --no-merges --oneline -- src/bootstrap


src/bootstrap/bootstrap.py


这段代码是 Rust 编译器构建系统的主入口脚本。让我解释主要功能:

  1. 主要函数和用途:
  • parse_args(): 解析命令行参数,比如 --build-dir--config 等配置选项
  • parse_stage0_file(): 读取初始构建阶段的配置文件
  • bootstrap(): 主要的构建流程函数
  • main(): 程序入口点
  1. 构建流程主要做这几件事:
  • 检查源代码环境(是否是 git 仓库等)
  • 读取配置文件(config.toml)
  • 设置构建目录
  • 下载必要的工具链
  • 构建初始引导程序
  • 运行真正的构建过程
  1. 特别的功能:
  • 支持帮助信息(--help)
  • 显示构建时间
  • 错误处理和退出码管理
  • 支持不同的构建配置文件
  1. 使用示例:
1
2
3
4
5
6
7
8
# 显示帮助信息
python x.py help

# 带配置文件的构建
python x.py --config config.toml

# 清理并构建
python x.py --clean

这是 Rust 的构建系统的一个重要部分,主要用于:

  • Rust 开发者构建 Rust 编译器
  • 自定义 Rust 工具链的构建
  • 在不同平台上编译 Rust

如果你只是普通的 Rust 程序员,通常不需要直接使用这个脚本。一般使用 rustup 这样的工具来管理 Rust 环境就可以了。这个脚本主要是给 Rust 语言开发者使用的。


1228行

这是一段用 Python 编写的构建和下载工具代码,主要用于 Rust 编程语言的构建系统。让我解释一下主要功能:

  1. 核心功能:
  • 下载和验证文件(主要是 Rust 编译器和工具链)
  • 解压缩文件包
  • 检测系统平台和 CPU 架构
  • 执行命令行操作
  1. 主要类和函数:

download()_download():

  • 负责下载文件
  • 优先使用 curl,如果在 Windows 上失败会fallback到 PowerShell
  • 支持断点续传和重试

verify():

  • 验证下载文件的 SHA256 校验和
  • 确保下载的文件完整性

default_build_triple():

  • 检测当前系统的目标三元组(CPU架构-厂商-操作系统)
  • 用于确定需要下载哪个版本的工具链

unpack():

  • 解压下载的 tarball 文件到指定目录

Stage0Toolchain 类:

  • 表示 Rust 的初始工具链
  • 包含版本和日期信息
  1. 特点:
  • 跨平台支持(Windows、Linux、macOS 等)
  • 健壮的错误处理
  • 支持并行处理
  • 详细的日志记录选项

这个代码是 Rust 构建系统的一部分,用于自动化下载和设置 Rust 编译器工具链的过程。它确保构建过程可以在不同平台上可靠地运行。


这段代码是 Rust 编程语言编译器构建系统的一部分。让我用简单的话解释主要功能:

  1. 这是一个用 Python 编写的构建脚本,主要用来下载和设置 Rust 编译器的构建工具链。

  2. 主要功能包括:

  • RustBuild 类负责管理整个 Rust 的构建过程
  • download_toolchain() 方法用来下载 Rust 的构建工具(包括编译器和 Cargo 包管理器)
  • unpack_component() 用来解压下载的工具包
  • build_bootstrap() 用来构建基础工具链
  1. 这个脚本会:
  • 检查是否需要下载新的工具链
  • 下载必要的组件
  • 解压文件到正确的位置
  • 设置正确的环境变量和配置
  • 启动实际的构建过程
  1. 它还包含一些特殊处理:
  • 在 NixOS 系统上的特殊处理
  • 多平台支持(Windows、Linux 等)
  • 版本和缓存管理

这基本上是 Rust 编译器”自举”(bootstrap)过程的一部分 - 也就是用较老版本的 Rust 编译器来构建新版本编译器的过程。这是编译器开发中一个常见的步骤。

如果你是 Rust 开发者或者对编译器开发感兴趣,这个脚本对你会比较重要。如果你只是使用 Rust 编程,通常不需要直接接触这部分代码,因为通常会使用 rustup 等工具来管理 Rust 工具链。