8.Vue框架快速上手.pptx
Vue介绍


将MVC中的Controller替换成了更强大的BiewModel,可以做数据监听,可以绑定
如果model的变化影响了页面,叫单向的;
如果页面的变化同时影响了model,称为双向绑定,Vue实现了双向绑定
屏蔽了JS中的各种DOM操作
两个花括号 里面的是数据,mount是渲染到哪里
不通过构建工具使用:
demo.html:
1
2
3
4
5
6
7
8
9
10
11
12
13
14
15
16
17
18
19
20
21
22
23
24
25
| <!DOCTYPE html>
<html lang="en">
<head>
<meta charset="UTF-8">
<meta http-equiv="X-UA-Compatible" content="IE=edge">
<meta name="viewport" content="width=device-width, initial-scale=1.0">
<title>Document</title>
<script src="https://unpkg.com/vue@3"></script>
</head>
<body>
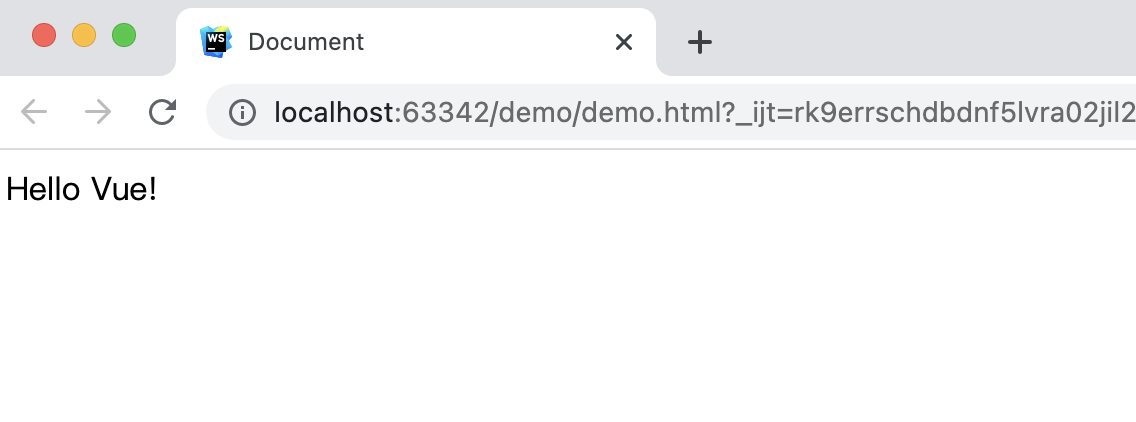
<div id="app">
{{message}}
</div>
<script>
Vue.createApp({
data() {
return {
message: 'Hello Vue!'
}
}
}).mount('#app')
</script>
</body>
</html>
|
https://unpkg.com/vue@3 这个就是Vue的源码
Vue具体指令
全部代码
1.基本用法如上代码
2. 内容渲染 指令
{}里面的,在js里叫对象
1
2
3
4
5
6
7
8
9
10
11
12
13
14
15
16
17
18
19
20
21
22
23
24
25
26
27
28
29
30
31
32
33
| <!DOCTYPE html>
<html lang="en">
<head>
<meta charset="UTF-8">
<meta name="viewport" content="width=device-width, initial-scale=1.0">
<title>Document</title>
<script src="https://unpkg.com/vue@next"></script>
</head>
<body>
<div id="app">
<p>姓名:{{username}}</p>
<p>性别:{{gender}}</p>
<p>{{desc}}</p>
<p v-html="desc"></p>
</div>
<script>
const vm = {
data: function(){
return {
username: 'zhangsan',
gender: '男',
desc: '<a href="http://www.baidu.com">百度</a>'
}
}
}
const app = Vue.createApp(vm)
app.mount('#app')
</script>
</body>
</html>
|
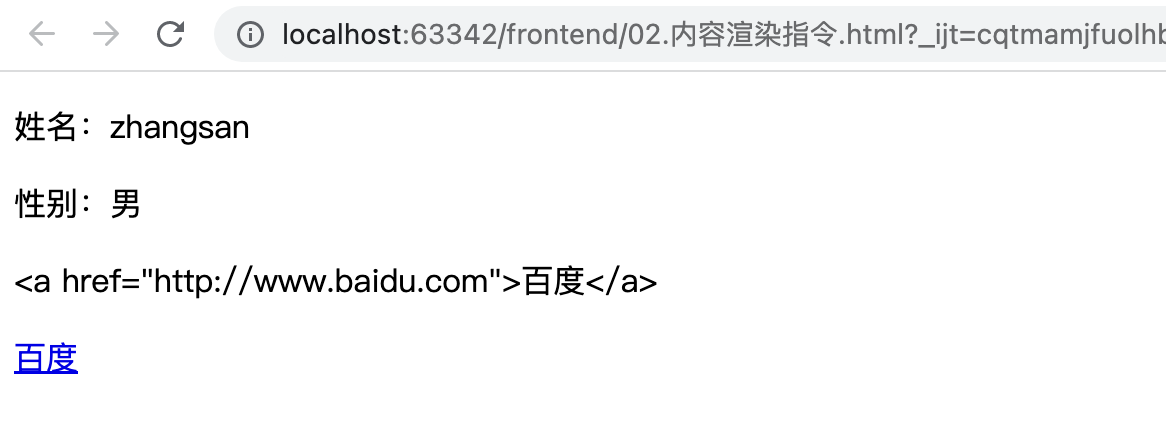
v-html会对内容做渲染,如上图的最后两行之间的差异
3. 属性绑定 指令
想把数据渲染到标签的属性里面
在前面加一个v-bind:, 也可以省略v-bind,直接一个:
1
2
3
4
5
6
7
8
9
10
11
12
13
14
15
16
17
18
19
20
21
22
23
24
25
26
27
28
29
30
31
32
33
34
35
| <!DOCTYPE html>
<html lang="en">
<head>
<meta charset="UTF-8"/>
<meta name="viewport" content="width=device-width, initial-scale=1.0"/>
<title>Document</title>
<script src="https://unpkg.com/vue@next"></script>
</head>
<body>
<div id="app">
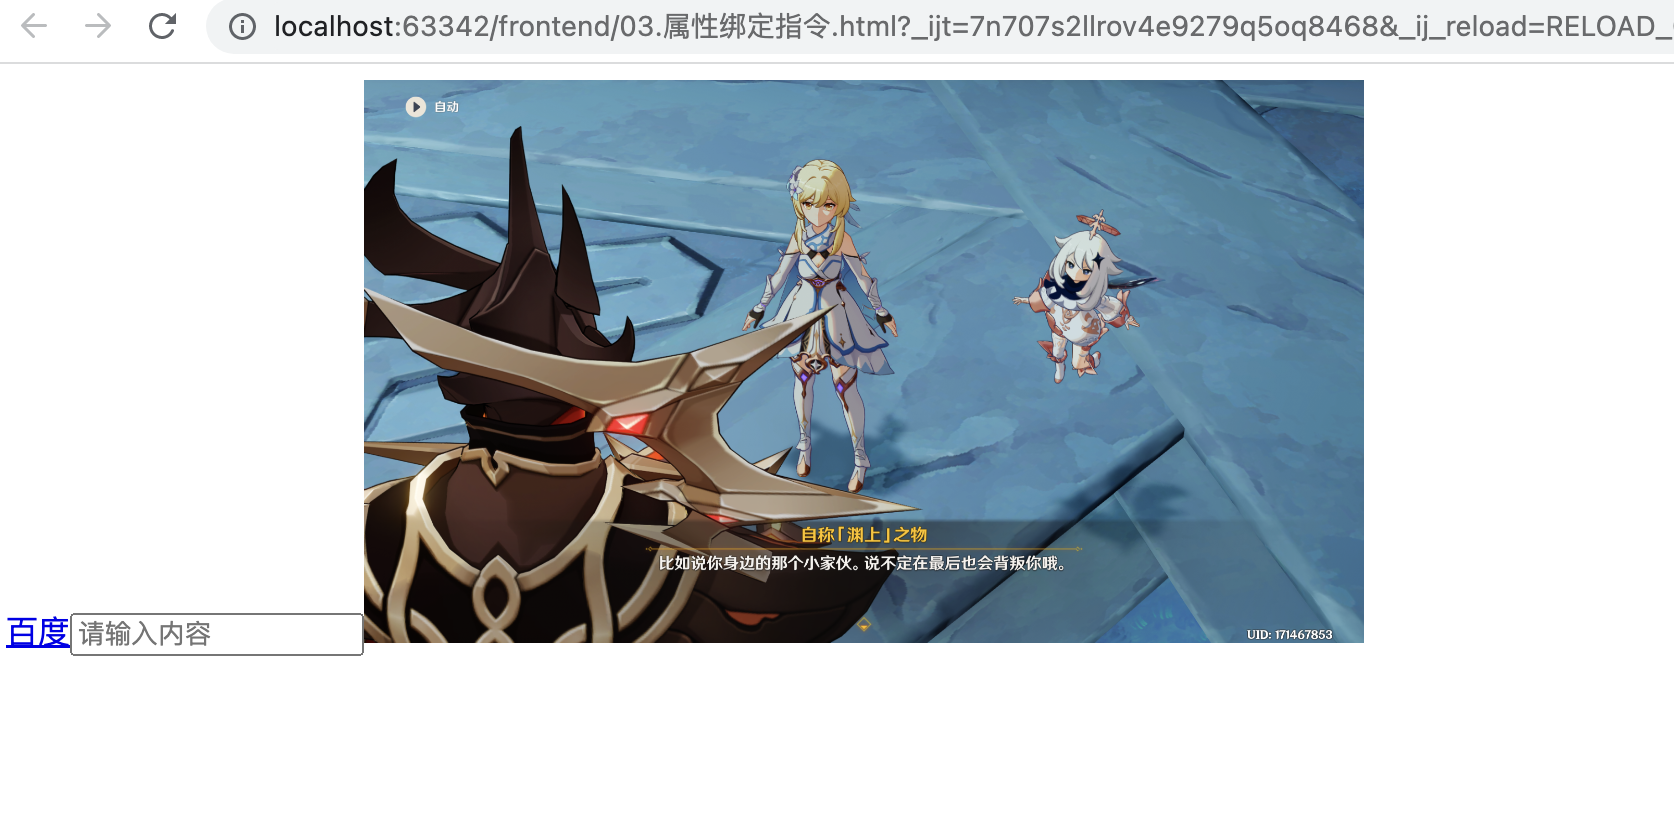
<a :href="link">百度</a>
<input type="text" :placeholder="inputValue">
<img :src="imgSrc" :style="{width:w}" alt="">
</div>
<script>
const vm = {
data: function () {
return {
link: "http://www.baidu.com",
inputValue: '请输入内容',
imgSrc: './images/demo.png',
w: '500px'
}
}
}
const app = Vue.createApp(vm)
app.mount('#app')
</script>
</body>
</html>
|
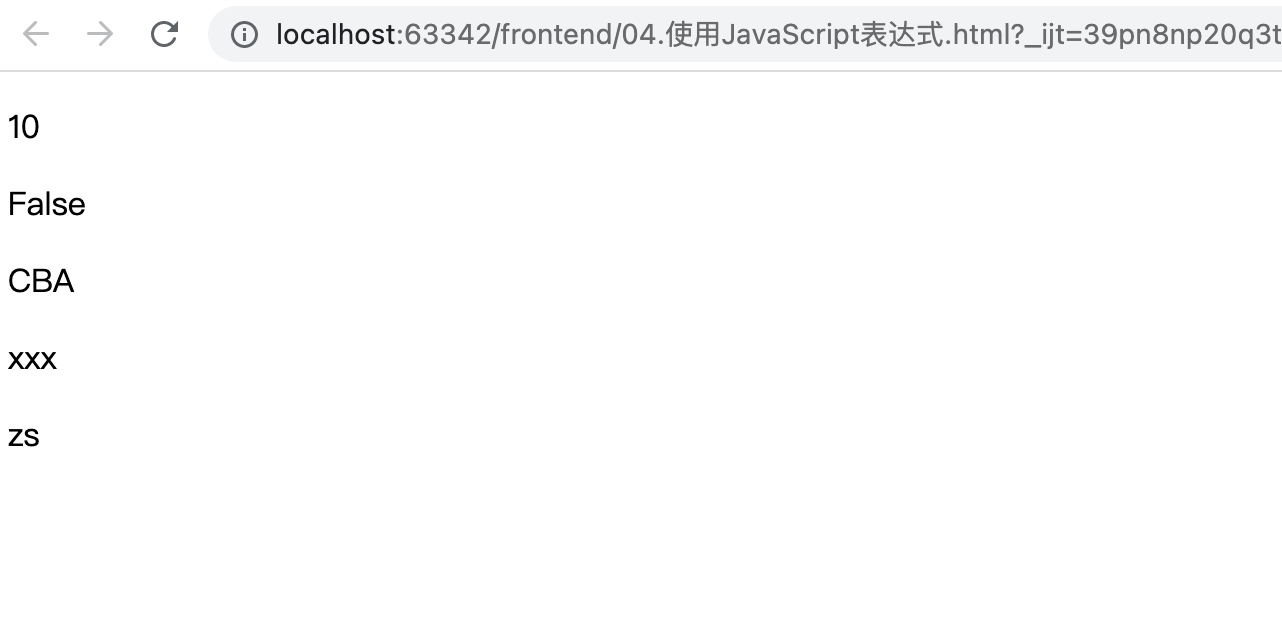
4. 使用JavaScript表达式
1
2
3
4
5
6
7
8
9
10
11
12
13
14
15
16
17
18
19
20
21
22
23
24
25
26
27
28
29
30
31
32
33
34
35
36
37
| <!DOCTYPE html>
<html lang="en">
<head>
<meta charset="UTF-8"/>
<meta name="viewport" content="width=device-width, initial-scale=1.0"/>
<title>Document</title>
<script src="https://unpkg.com/vue@next"></script>
</head>
<body>
<div id="app">
<p>{{number + 1}}</p>
<p>{{ok ? 'True' : 'False'}}</p> // 三目运算符
<p>{{message.split('').reverse().join('')}}</p> // 调用js里的方法
<p :id="'list-' + id">xxx</p>
<p>{{user.name}}</p>
</div>
<script>
const vm = {
data: function () {
return {
number: 9,
ok: false,
message: 'ABC',
id: 3,
user: {
name: 'zs',
}
}
}
}
const app = Vue.createApp(vm)
app.mount('#app')
</script>
</body>
</html>
|
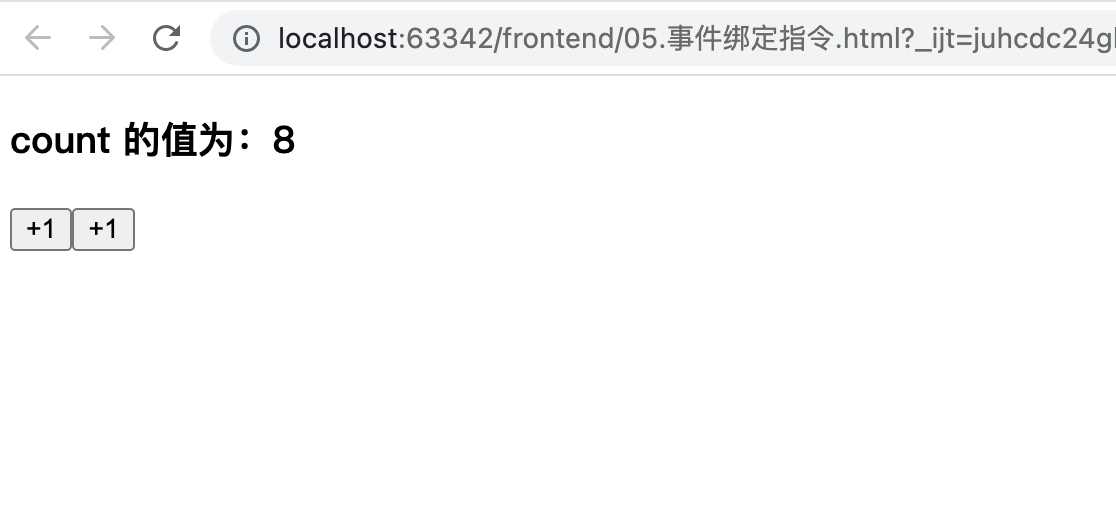
5. 事件绑定 指令
比如点了某个按钮,触发某个操作
1
2
3
4
5
6
7
8
9
10
11
12
13
14
15
16
17
18
19
20
21
22
23
24
25
26
27
28
29
30
31
32
33
34
| <!DOCTYPE html>
<html lang="en">
<head>
<meta charset="UTF-8"/>
<meta name="viewport" content="width=device-width, initial-scale=1.0"/>
<title>Document</title>
<script src="https://unpkg.com/vue@next"></script>
</head>
<body>
<div id="app">
<h3>count 的值为:{{count}}</h3>
<button v-on:click="addCount">+1</button>
<button @click="count+=1">+1</button>
</div>
<script>
const vm = {
data: function () {
return {
count: 0,
}
},
methods: {
addCount() {
this.count += 1
},
},
}
const app = Vue.createApp(vm)
app.mount('#app')
</script>
</body>
</html>
|
原生的js事件绑定用的是onclick,Vus里用的是v-on,可以简写为@,后面可以跟表达式,如果比较复杂,也可以自己定义一个函数(只能定义在vm对象里面),我们自定义的方法,要放到methods里面,定义的办法有很多种(js语法太灵活..)
数据一旦变化了,页面会自己刷新的,这就是双向绑定
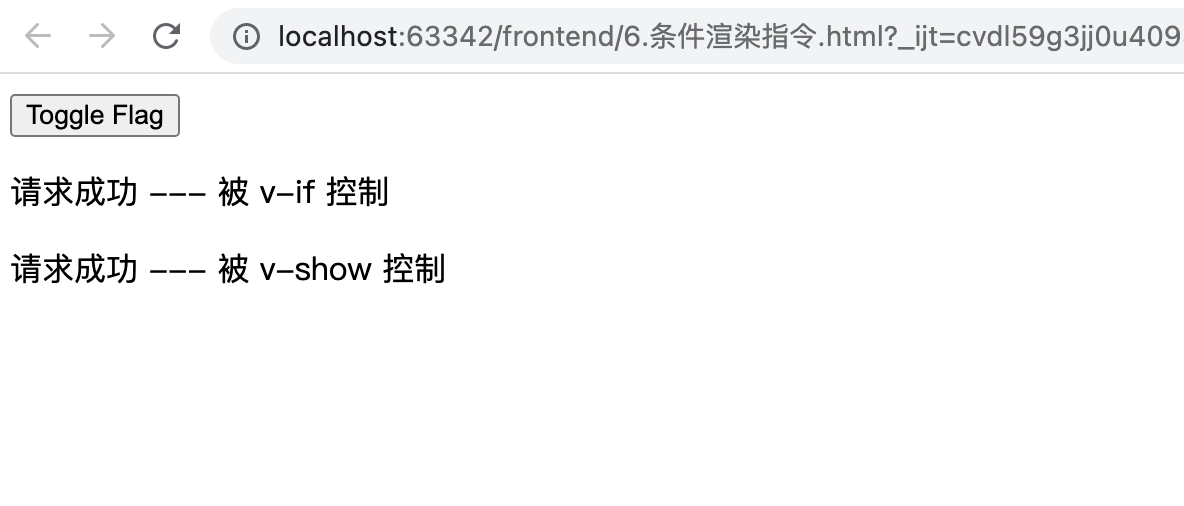
6. 条件渲染 指令
根据某个条件,控制页面的某个元素是否显示
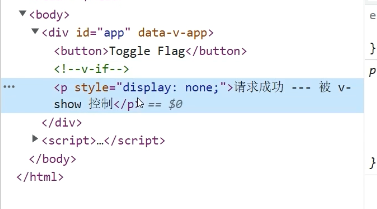
v-if,v-show,传递一个bool,如果为true,则标签被渲染
二者的差别是,如果为false,v-if则该标签压根不会被创建,v-show还会创建,但通过css的方式隐藏了
v-show性能更高一点
1
2
3
4
5
6
7
8
9
10
11
12
13
14
15
16
17
18
19
20
21
22
23
24
25
26
27
28
29
30
31
32
| <!DOCTYPE html>
<html lang="en">
<head>
<meta charset="UTF-8"/>
<meta name="viewport" content="width=device-width, initial-scale=1.0"/>
<title>Document</title>
<script src="https://unpkg.com/vue@next"></script>
</head>
<body>
<div id="app">
<button @click="flag = !flag">Toggle Flag</button>
<p v-if="flag">请求成功 --- 被 v-if 控制</p>
<p v-show="flag">请求成功 --- 被 v-show 控制</p>
</div>
<script>
const vm = {
data: function () {
return {
flag: false,
}
}
}
const app = Vue.createApp(vm)
app.mount('#app')
</script>
</body>
</html>
|
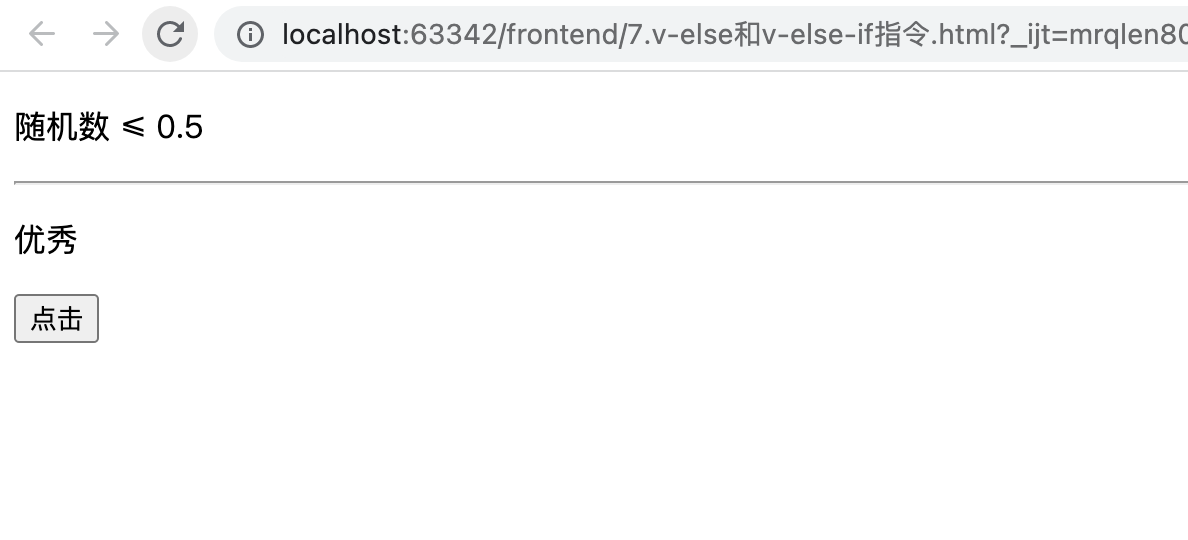
7. v-else和v-else-if 指令
多个条件的判断
1
2
3
4
5
6
7
8
9
10
11
12
13
14
15
16
17
18
19
20
21
22
23
24
25
26
27
28
29
30
31
32
33
34
35
36
37
38
39
40
41
42
43
44
45
46
47
48
49
| <!DOCTYPE html>
<html lang="en">
<head>
<meta charset="UTF-8"/>
<meta name="viewport" content="width=device-width, initial-scale=1.0"/>
<title>Document</title>
<script src="https://unpkg.com/vue@next"></script>
</head>
<body>
<div id="app">
<p v-if="num > 0.5">随机数 > 0.5</p>
<p v-else>随机数 ≤ 0.5</p>
<hr/>
<p v-if="type === 'A'">优秀</p>
<p v-else-if="type === 'B'">良好</p>
<p v-else-if="type === 'C'">一般</p>
<p v-else>差</p>
<div v-show="a">
测试
</div>
<button @click="!a">点击</button>
</div>
<script>
const vm = {
data: function () {
return {
num: Math.random(),
type: 'A',
a: false
}
},
methods: {
f: function () {
this.a = !this.a
}
}
}
const app = Vue.createApp(vm)
app.mount('#app')
</script>
</body>
</html>
|
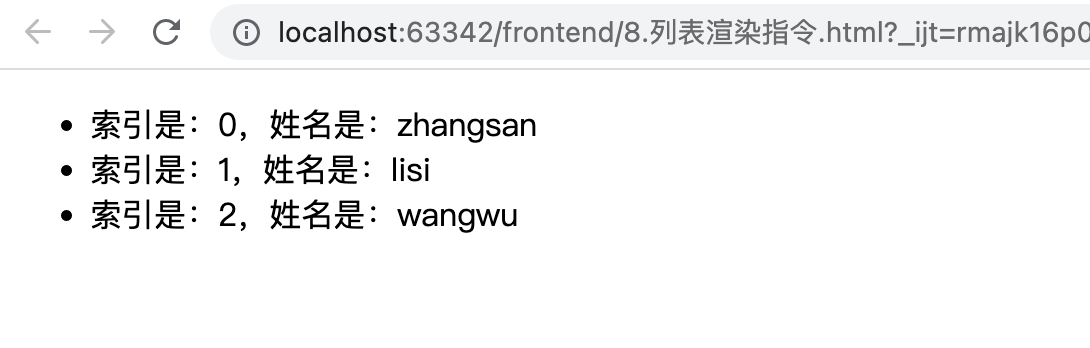
8. 列表渲染 指令
v-for
实际写只有一个li标签,但实际渲染显示时,有多个li标签
1
2
3
4
5
6
7
8
9
10
11
12
13
14
15
16
17
18
19
20
21
22
23
24
25
26
27
28
29
30
31
32
33
| <!DOCTYPE html>
<html lang="en">
<head>
<meta charset="UTF-8"/>
<meta name="viewport" content="width=device-width, initial-scale=1.0"/>
<title>Document</title>
<script src="https://unpkg.com/vue@next"></script>
</head>
<body>
<div id="app">
<ul>
<li v-for="(user, i) in userList">索引是:{{i}},姓名是:{{user.name}}</li>
</ul>
</div>
<script>
const vm = {
data: function () {
return {
userList: [
{id: 1, name: 'zhangsan'},
{id: 2, name: 'lisi'},
{id: 3, name: 'wangwu'},
],
}
},
}
const app = Vue.createApp(vm)
app.mount('#app')
</script>
</body>
</html>
|
9. v-for中的key
<li v-for="(user, index) in userlist" :key="user.id">
给每个被循环的标签加一个唯一索引
1
2
3
4
5
6
7
8
9
10
11
12
13
14
15
16
17
18
19
20
21
22
23
24
25
26
27
28
29
30
31
32
33
34
35
36
37
38
39
40
41
42
43
44
45
46
47
48
49
50
51
52
53
54
55
56
57
58
59
| <!DOCTYPE html>
<html lang="en">
<head>
<meta charset="UTF-8">
<meta name="viewport" content="width=device-width, initial-scale=1.0">
<title>Document</title>
<script src="https://unpkg.com/vue@next"></script>
</head>
<body>
<div id="app">
<div>
<input type="text" v-model="name">
<button @click="addNewUser">添加</button>
</div>
<ul>
<li v-for="(user, index) in userlist" :key="user.id">
<input type="checkbox"/>
姓名:{{user.name}}
</li>
</ul>
</div>
<script>
const vm = {
data: function () {
return {
userlist: [
{id: 1, name: 'zhangsan'},
{id: 2, name: 'lisi'}
],
name: '',
nextId: 3
}
},
methods: {
addNewUser() {
this.userlist.unshift({id: this.nextId, name: this.name})
this.name = ''
this.nextId++
}
}
}
const app = Vue.createApp(vm)
app.mount('#app')
</script>
</body>
</html>
|
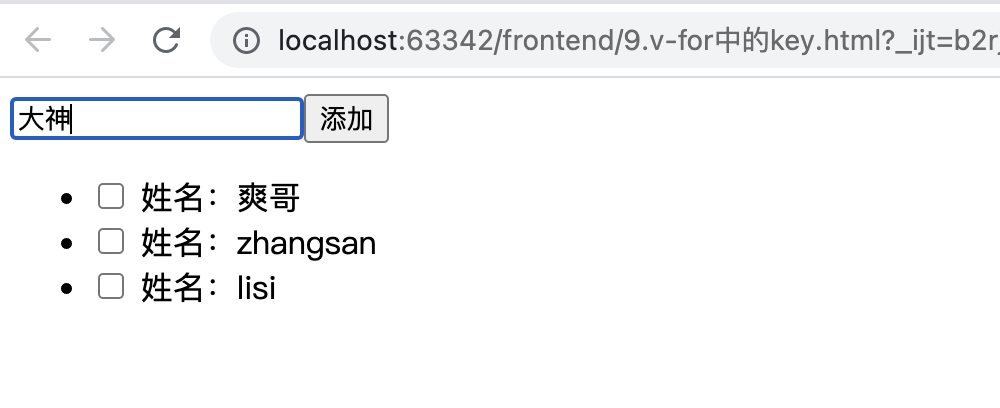
v-model双向绑定指令,当页面内容发生变化,也会影响name的值 (用户输入的内容,会自动影响name的属性值)
而:value,是单向绑定,name发生变化,页面会变化,反之则不会。
往对象的起始位置加一个元素,用unshift
一般会用数据库里的主键,作为li标签里面的key
原文链接: https://dashen.tech/2021/11/13/Vue基础入门/
版权声明: 转载请注明出处.